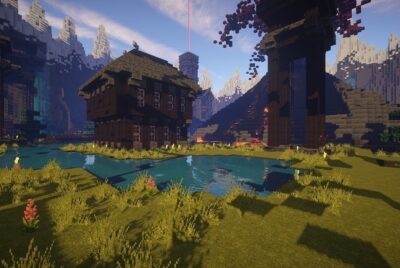
Realistic Minecraft Texture Pack
Have we ever wondered how to take our Minecraft experience to the next level? We know that Minecraft is already an incredibly immersive game, but adding realistic texture packs can significantly change our gaming experience. By transforming the way structures, biomes, and characters appear, realistic texture packs bring a fresh feel to our blocky adventures. Let’s explore what makes realistic Minecraft texture packs so special and how we can make our game world look stunningly lifelike.


What Are Realistic Minecraft Texture Packs?
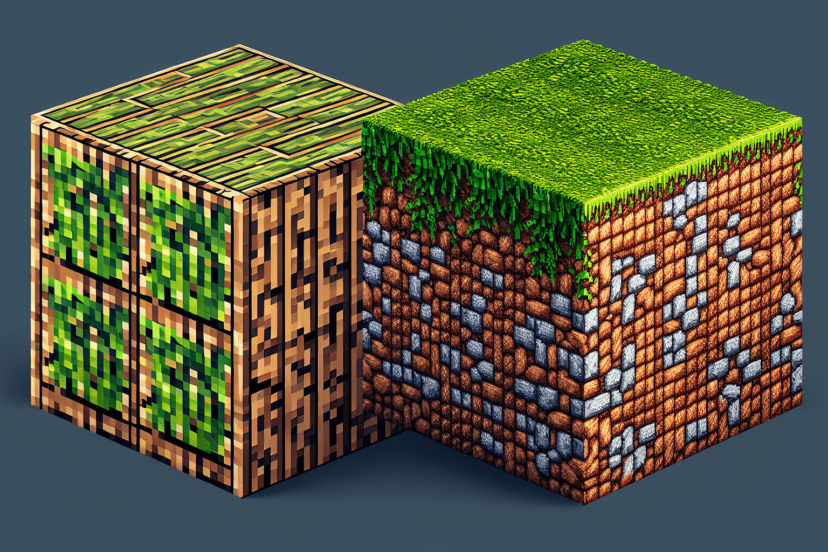
Realistic Minecraft texture packs are modifications to the game that alter the appearance of the game’s blocks, items, and entities, making them look more lifelike and natural. Unlike the default pixelated art style, these packs incorporate higher resolution images and more intricate designs to replicate the real world as closely as possible.
Why Choose a Realistic Texture Pack?
Realistic texture packs can dramatically transform our in-game surroundings. The blocks, which usually appear simplistic and pixelated, can be made to look more detailed with textures that imitate realistic surfaces such as wood grain, stone, grass, and water. This enhanced visual experience makes our gameplay more engaging and stimulating.
Popular Realistic Texture Packs
There are several popular realistic texture packs available. Here’s a table to showcase some notable ones and what makes them unique:
| Texture Pack Name | Resolution | Features |
|---|---|---|
| LB Photo Realism | 128x, 256x, 512x | High-detail textures, realistic skies, and foliage |
| Soartex Fanver | 64x, 128x | Smooth textures and subtle realism |
| SEUS PTGI (Shader) | – | Combines with texture packs for dynamic lighting |
| Patrix | 32x, 128x, 256x | Hyper-realistic textures with custom models |
| Realistico | 128x, 256x, 512x | 3D modeling and PBR support |
How to Install Realistic Texture Packs
Installing a realistic texture pack is straightforward, but for the best experience, we might want to follow some steps to ensure everything runs smoothly.
Step-by-Step Installation Guide
- Download Resource Pack:
- Find a reliable source to download our desired texture pack. This could be from trusted websites or directly from the creators.
- Install OptiFine (Optional but recommended):
- OptiFine improves Minecraft’s performance while adding several new graphical options, including better visual effects for realistic texture packs.
- Visit the OptiFine website and download the latest version compatible with our Minecraft version.
- Locate Minecraft Resource Pack Folder:
- Navigate to the Minecraft directory on our computer. This can usually be found in:
- Windows:
%appdata%/.minecraft/resourcepacks - Mac:
~/Library/Application Support/minecraft/resourcepacks
- Windows:
- Navigate to the Minecraft directory on our computer. This can usually be found in:
- Move the Downloaded Pack:
- Drag and drop the downloaded texture pack zip file into the “resourcepacks” folder.
- Activate the Texture Pack in Game:
- Start Minecraft, go to
Options>Resource Packs, and select the pack from the list. Click “Done” to load the pack.
- Start Minecraft, go to
- Install Shaders (Optional):
- To enhance realism with better lighting and shadows, download shaders such as SEUS or Sildur’s Shaders. These can be added through OptiFine by placing them in the “shaderpacks” folder in our Minecraft directory.
Combining Shaders with Texture Packs
For the most immersive experience, realistic texture packs can be combined with shaders, which modify the game’s lighting, shadows, and graphical effects. Shaders give us realistic water reflections, dynamic shadows, and more realistic sunlight.
Recommended Shaders
Some popular shader packs that work well with realistic texture packs include:
| Shader Name | Features |
|---|---|
| SEUS (Sonic Ether’s Unbelievable Shaders) | Realistic lighting, water reflections, and shadow effects |
| Continuum Shader | High-quality visuals, realistic skies, and natural light rays |
| Sildur’s Shaders | Various options from basic to extreme, vibrant lighting |
| BSL Shaders | Balanced performance and visual quality, smooth lighting |
Performance Considerations
Using realistic texture packs often requires a more powerful computer to maintain smooth gameplay. Higher resolution textures can be demanding on our system resources, and combining them with shaders can add to the load.
Optimizing Performance
Here are some tips to balance performance and visual quality:
- Lower the Resolution: If our system struggles with 512x textures, we can opt for lower resolutions, such as 128x or 256x.
- Adjust Graphics Settings: In the Minecraft settings, we can tweak graphics settings like render distance, smooth lighting, and particles to find the right balance.
- Use OptiFine: As mentioned, OptiFine provides options to optimize the game’s performance.
- Close Unnecessary Programs: Ensure no other programs are consuming significant system resources while playing Minecraft.

Customizing and Personalizing
Adding a realistic texture pack isn’t just about downloading and installing; we can also personalize our experience by combining different elements or even creating our own custom packs.
Mixing Texture Packs
We can mix and match textures from different packs to create a custom look that suits our preferences. For instance, we might like the realistic earth textures from one pack and the detailed sky textures from another.
Creating a Custom Texture Pack
For those of us who are a bit more adventurous, creating our own texture pack can be a rewarding experience. Here are the steps to get started:
- Understand the Basics:
- Texture packs are essentially collections of images (textures) that replace the default game assets.
- Gather Tools:
- We will need an image editing program like Photoshop or GIMP.
- Extract Default Textures:
- We can use tools like Minecraft Texture Ender or various online utilities to extract the default game textures.
- Edit Textures:
- Edit the extracted textures using our image editing software. Ensure the dimensions remain consistent with the original textures.
- Format and Compress:
- Once all the custom textures are ready, we need to ensure they are correctly formatted and compressed into a zip file.
- Test In-Game:
- Load our custom texture pack in Minecraft through the Resource Packs menu to see our creations in action.
Benefits of Realistic Texture Packs
Using realistic texture packs can have several advantages that enhance our Minecraft experience.
Enhanced Aesthetics
The primary benefit is the improved visual appeal. Realistic textures make our world look stunning and more immersive. The detailed textures can make environments appear richer, creating a more enjoyable experience.
Better Role-Playing Experience
For those of us who enjoy role-playing or creating in-depth storylines within our Minecraft worlds, realistic texture packs can add an extra layer of authenticity. They can make structures look more convincing and landscapes more dramatic.
Educational Potential
Realistic textures can also have educational benefits. For example, they can help us understand geological features, architectural styles, and natural environments more clearly within the confines of the game. This could be particularly useful for educators using Minecraft as a teaching tool.

Drawbacks and Limitations
While realistic texture packs provide many benefits, there are also some drawbacks we should be aware of.
Performance Issues
As mentioned, high-resolution packs can be resource-intensive. If our computer is not equipped to handle the extra load, we might experience lag, longer load times, or even crashes.
Compatibility
Not all texture packs are compatible with the latest Minecraft versions or with other mods. We might need to wait for updates or find alternative packs if compatibility issues arise.
Loss of Original Charm
Some players might feel that realistic texture packs take away from the original charm and simplicity of Minecraft’s default art style. For those who appreciate the classic pixelated look, realistic textures might not be the preferred choice.
Conclusion
Realistic Minecraft texture packs offer a unique way to enhance and personalize our gaming experience. By understanding what they are, how to install them, and optimizing their use, we can transform our Minecraft world into a visually stunning landscape. While there are some performance considerations and compatibility issues to be mindful of, the benefits often outweigh these drawbacks. Whether we are looking to create more immersive role-playing scenarios, enrich educational experiences, or simply enjoy a more beautiful game world, realistic textures can breathe fresh life into our blocky adventures. Let’s not hesitate to experiment and find the perfect pack that suits our style and system capabilities. Happy crafting!